


FMP - SILENT HILL CREATURE DESIGN
By looking at my main WIX site, it's easy to deduce I'm a fan of horror games, so for my Final Major Project I wanted to develop a creature concept and fully game-ready model based on one of my favourite horror franchises. This will involve research, drawings, modelling, rigging and animating.
To start, I looked into some of my favourite Silent Hill designs and learned what is so unique about them.
(All non-originally created images will have a tooltip with credits, just hover your mouse over them. Proper citing can be found at the bottom of this page.)


RESEARCH STAGE
I had to keep in mind the biggest aspect of Silent Hill creature design philosophy: the monsters are related to the characters! This means that I can't just create a semi-appropriate creature design and call it a day, I need to choose someone to base the creature off of. I had the option of either choosing an existing franchise character or someone in real life, a real person or me.
It's important to do an overview of this franchise's design philosophy in more detail, to better clarify how I proceeded with the project and give viewers a point of reference on how to criticize this project.
symbolism
The doll symbolises Annie Marie's guilt for cheating on her husband, despite him being loving and supportive, which lead to their divorce. In a novel, one Doll insults Annie by reminding her of her wedding vows and calling her a "slut".
With context, the design visualizes how she feels subconsciously, like an "object", with an ugly face, almost entirely covered by hair (which can be seen as the personality/soul, hidden in shame), but with an attractive body. The initial concept for this creature was called "Flirt".
The design's symbolism is leaning more towards literal and is only mostly conveyed visually. Gameplay mechanics and animation also play a part in communicating a creature's meaning.


As briefly referenced before, Silent Hill's creatures are related to the characters present within the town of Silent Hill, as in, they represent aspects of those character's personality and history. The designs make heavy use of Symbolism.
As an example: the Doll from Silent Hill Downpour.
A living mannequin creature with a brutally disfigured face. It wears provocative clothing (there are variations of this creature, some of them being naked), and moves very stiffly, like a doll would.

body horror & humanity
From the debut title to the present, Silent Hill's creature design changed to match both the different themes of each game and the evolving atmosphere of the franchise. Most entries consistently use body horror as the main focus of it's creature design, with clear exceptions,.
Body horror is known for it's phycological effect on the human mind. A body distorting from our perceived belief of "normal" heavily plays with humanity's fear of vulnerability and loss of control. This can be seen in accidents or medical conditions which leave a person disabled in some way.
It can also involve graphic violence, blood and gore, things that humans instinctively fear, as part of our survival instinct
The addition of a psychological connection to the designs enhances what otherwise would be a walking, disfigured corpse. These monsters are the characters, the things they lock away in their subconscious brought to life in the most horrifying way possible by an unkind and unfeeling god.
The monsters are human and the humans can be as monstrous as the creatures they face.
psychosexuality
"Psychosexual media relates to the mental aspects of sex, such as sexual fantasies or having to do with the psychological aspects of sexuality in contrast to the physical aspects" - IMDB
Sexuality, or some aspect of it, is probably the most frequent theme in the Silent Hill franchise.
In Silent Hill 2, the main character James Sunderland, struggled mainly due to his relationship with his wife and recent events relating to her. The results of this were, among many, his sexual frustration and repression. This led to the conjuring of the Bubble Head Nurses, one of Silent Hill's most famous creatures.
In a similar vein, Silent Hill 3's protagonist, Heather Mason, struggled with growing up, her adolescence and looming adulthood were major parts of her character arc, as well as familial abuse, motherhood and her own sexual frustration.
In one way or another, be it through character themes or simply by having monsters be depicted in some sexually charged manner, psychosexuality is a large part of Silent Hill's design DNA.

With these things in mind, the "fear" I chose for my creature to represent was the "Fear of Being a Weight to your Family", the fear your presence amongst your family brings them down.
DESIGN STAGE
Anatomy is often the element of a monster's design that ties them the most to their character and what makes them more obviously human in some way, which adds to the horror.
With this in mind, I created my first concept sketch:
With my monster, there were some key elements I wanted to implement:
-
3 main figures, a Mother, Father and Child;
-
Melted anatomy, body parts fused together in some way;
-
Large body deformations;
-
Straps/Restraints.
This first concept is simple, but I feel it's fitting for the franchise, even if it is incomplete. It's what I used as a baseline for future concepts and what I used as a reference for my Survey.
This survey was used to gauge interest in the design and to gather some opinions and suggestions for me to use as inspiration and as references for future designs.


The second concept implemented some ideas from survey answers, while some elements were original. This was so I didn't fully rely on stranger's ideas for my design.
This design stands out as the most "obviously scary" one. Big tall monster with pointy bits that kill you if you get close. The bladed hands could be swapped for hooks, saws, any other scary sharp object for the final version, but it was never developed for long enough to get to that point.
While I am happy with the design and there are certain parts of it I think would work for this project, mainly the double head, multiple arms and the way bodies are fused, overall it doesn't fit with the franchise, in my opinion.
The third and final concept went through several versions. Before this, I invested on an iPad to speed up my work and to be able to present it more professionally. For this, I used Procreate, which is an industry standard for drawing on the go.
Drawing digitally allows the use of Layers, which is fantastic for organizing my work and avoiding and correcting mistakes, as well and being able to make changes to the drawing at any stage without much time loss.
This is the first sketch of what would become the final version of my monster design.
I took the multiple arms concept of the second creature and adapted it to a spider-like design, the clear evolution of any multi-armed thing. This monster would crawl on ceilings and tight hallways and passages following the player in ways most other monsters couldn't.
The parents' heads are prominent in this design, but I felt that might look silly rather than creepy when fully realized, so I eventually moved on from that idea.

CREATION STAGE
I begun by taking my final concept into Blender, a very popular 3D software and free alternative to some paid industry standard ones, to use it as a reference to create a basic initial model.
Making original human models was unnecessary for this project, since human modelling wasn't part of what i was trying to showcase, so I found some free to use models on TurboSquid.
.jpg)

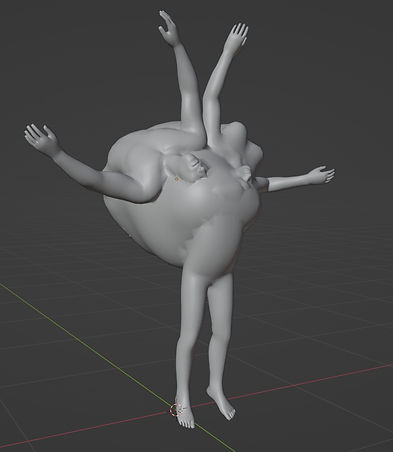
Finding a child model to use on the front of the creature was troublesome so i instead decided to take the fathers body and edited it to look more childlike in terms of proportions, but removed limbs and details on the chest since those wouldn't be necessary.
The next step was to pose these models to be relatively close to the concept art.
base model
Using Blender's very helpful Auto-Rigger, I was able to automatically and quickly create RIGs, or animation skeletons, for these models so I could pose them in a way close to the concept art, but with their limbs stretched for future, manual rigging for when the monster was finalized.
This RIG is not what I ended up using for the final result, it was simply made to pose these models.
The next step was to fill in the gaps between the models and make them come together in a very unnatural way.

Blender has a very useful tool called MetaBalls. These can almost be used the same way as Cubes, Spheres, etc, added into the scene and moved around and edited, but work very differently in how they can be multiplied and combined.
.jpg)
.jpg)
.jpg)
When close to each other, they begin to automatically fuse together in a very organic way, this can be useful for sort of sculpting shapes, by simply multiplying them and moving them into each other or close to one another. While not perfect by themselves, they're great for creating bases of what can become organic models.
.jpg)
These MetaBalls were very useful for quickly creating organic masses to add to the base model of my creature.
Some details like the size of the creature's back, how the MetaBall mass connects to the human bodies, how the faces appear on the body, those can easily be changed in the next steps of the project, where i take this base model into Zbrush for detail sculpting.
sculpting
Zbrush is a software made specifically for sculpting, from sculpting a new model from scratch to adding detail to existing models.
This part of the creation process was relatively simple: I imported my base model into the software and added detail to it, reshaped parts of the body, smoothed out the areas where the human bodies and the MetaBalls didn't properly connect and generally made the creature more icky.


Zbrush has many sculpting brushes that make it easy to reshape models and add many different kinds of details, including skin. Pores, wrinkles, wounds and exposed fleshy bits are easy to make. Gives the model some texture even when it doesn't actually have a texture applied to it.


The way these brushes work is through the use of Alphas. These are what really differentiate brushes, almost like different brush tips. Some alphas are ideal for strokes, some for stamping details onto the model and some simply for large shapes and sculpting.
I downloaded some alphas that were ideal for sculpting skin details. I found these on a dedicated website.


This is the Alpha i used for general skin details throughout the entire body. It's hard to notice from a distance.
This is the Alpha I used for adding wrinkles in multiple areas of the body where different body parts connected.
This is the Alpha I used for making wounded or especially deteriorated patches of skin.
This is the Alpha I used for elbows, knees, fingers and areas where I wanted heavier wrinkling.

After the detail sculpting was done, the model was left with many many many polygons, millions of them, absolutely unoptimized for a game model, so the next step was to reduce the amount of polygons.
INTERMISSION
Not to get sentimental, but halfway through my project I suffered through a considerably heavy bout of depression which severely affected the rate at which I could work, so I had to take a step back, look at the project and change my goals and the overall scale of it.
I would still make a game ready model and make it as detailed as I could, but most of what "game ready" entailed would be cut due to time, so testing it in game engines like Unreal and Unity, proper animation testing, etc would not be possible before the given deadline. I also switched from doing 3D work in Blender to Maya, since i was having many issues using Blender.
I truly and sincerely thank my tutors and friends for guiding and helping me finish my project. (not saying this to guilt trip you into giving me a better mark, but if you did, that would be really really cool.)
CREATION STAGE 2

retopologizing
& uv mapping
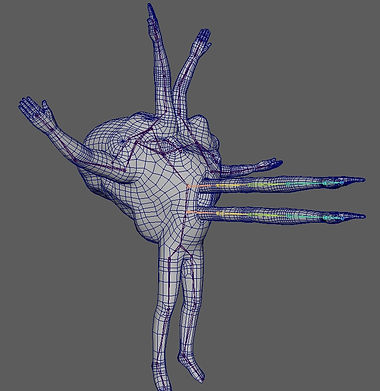
Topology refers to the distribution and structure of vertices, edges and faces (all combined making polygons) of a 3D model. The topology shows how well my model's mesh organized.
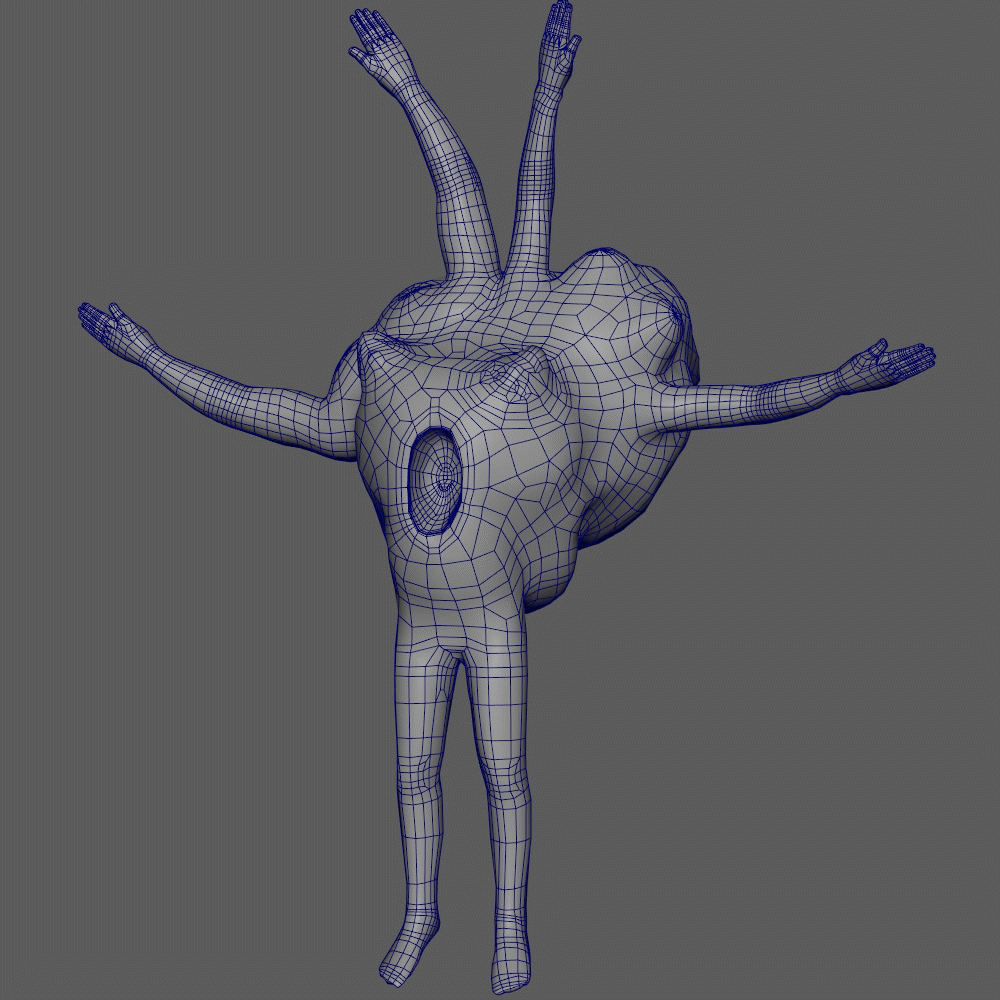
Since the sculpt left my creature with a wildly unoptimized topology for a game model, i had to manually Retopologize it, or reduce the amount of polygons and how they're organized while keeping the shape and detail of the sculpt.
This can be done through creating a new model on top of the sculpted one, recreating it with as few polygons as possible while maintaining the shapes and features.
Polygon magnetism is a helpful feature in Maya that lets me model on top of another chosen model, making the one I'm working on "stick" to the other and ensuring it keeps the same size and shape.
These images shows the retopology halfway through completion and really demonstrate how it's kept the same shape as the sculpt, but with much less taxing topology.
.jpg)
.jpg)
.jpg)
Some areas like the hands and feet had to be manually modelled separately due to the sculped ones being very unfinished. These would have to be added to the model after all retopology was completed.
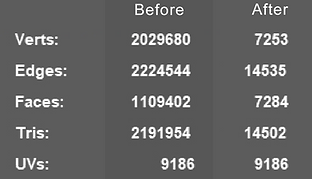
In the end, this is how the low-poly model turned out. As you can see the sculpted model is made up of so many polygons the software can't even render anything but blue.
Below will be the difference in the components of both models.
Before getting into the next step, which is texturing Warmth, i had to create proper UV maps for it.
Texture mapping, better known as UV mapping, is the process of organizing and planning out how textures will be projected onto the model. If a model's UV maps are unoptimized or simply not done, creating textures for it is much harder and generally leads to worse results. Proper UVs must be done manually in most cases, with the exception of very simple objects or objects that won't be the focus in a scene.
To create UVs, i have to "slice" the model open and unfold it, in the same manner you can slice open a cube and unfold it to look like a cross.


The white lines on the model show where it was cut. The unfolded UVs shown on the right might seem haphazardly spread around, but for the sake of simplicity i actually organized them into different sections belonging to different parts of the model. This was to make texturing later simpler.
Red - Mother
Blue - Father
Green - Backside
Baby Blue - Limbs
Yellow - Miscellaneous
The protruding limbs that would come out of the creature's chest were made separately, but the process was the exact same, but less interesting so i haven't mentioned it so far. With all of that done, it was time to texture everything.
texturing
To texture my monster, I used Adobe Substance Painter, the industry standard when it comes to 3D texturing.
The process of texturing was peculiar in the sense that there was no real technique or complexity to it. Substance enables the use of many different tools and techniques to texture models in many different ways with wildly different processes.
But I felt comfortable enough with the software that I simply freehand painted the creature and all it's details, with the software's standard brushes and textures, which were more than enough to give the monster the look I wanted for it
.jpg)
While lacking complexity, i can at least briefly detail my thought process while texturing:
I start with the look of the skin under all the grime and nastiness. Substance has a "Zombie Skin" texture that I can use. While thankfully not rotted, it doesn't give the skin a rough and bumpy look.
Then i start adding the dirtiness to it: grime, blood, rot, anything to make it look horribly unpleasant while maintaining the creepiness of the design.
Then i make certain parts of the model look darker, the skin beneath the backside of the creature, armpits, the cavity in the chest, etc, so that even when under flat lighting, some areas will always look darker.
.jpg)
The one proper technique i used while texturing was Baking.
Baking is a process and involves using both the low-poly model and the high-poly, sculpted model. It's a way to maintain the sculpted details from the high-poly model and project them onto the low-poly model, like a kind of texture.
Substance is able to take multiple aspects of the sculpted model, visual details like skin detailing but also how light hits different parts of the model. An easy way to demonstrate the effects of baking is by showing the difference between a baked model and an unbaked model:


Note that the resolutions between these images are different, as the left image was a test render, but everything else is the same. The difference in the creature's look and how light hits it is more than apparent.
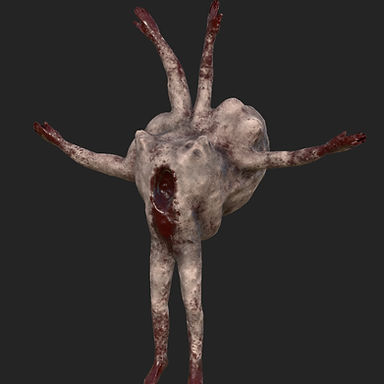
In retrospect, the amount of blood could make the creature stand out if it were to be added to the large pantheon of Silent Hill monsters, at least compared to most. But since I aimed to mix elements from the entire franchise's evolving design philosophy, I feel it can still have a place in it.
Overall, I'm very pleased with the final look of the monster. I'd share some testimonies from fellow classmates, tutors and family members about how horrid the thing is to look at, but I don't feel like it.

rigging
Creating an animation skeleton is always the biggest challenge when it comes to developing a character model.
The process of making all the body parts bend properly and move as intended is multi-layered and tedious, but eventually very rewarding.
Due to time constraints , I relied heavily on Maya's automatic RIG feature, but not entirely.
Rigging is mainly done through the use of Bones and Weight Painting.
Creating Bones is the easy bit, lining them up in a way similar to how skeletons work, where they bend and how they connect, but not exactly. Only as many bones necessary to move the character's body need to be created, with rare exceptions like connection bones that won't affect the model in cases where a model is especially inhuman.
.jpg)
.jpg)
Weight Painting is where the process becomes much more time consuming and where automating it saves a lot of that time, at the cost of quality.
Weight is the name given to the area affected by an animation skeleton's bones, this system gives 3D artists a very versatile method of creating the way their character is going to move and make sure moving the bones on the feet also doesn't strangely move the character's face.
Maya has multiple options for automatically rigging models, but I chose Interactive Auto-Rig, which lets me edit Maya's automatic weight selection for each bone I created and edit it to more closely resemble what areas of the model i want each bone to affect.
A few bones in my RIG don't affect the model at all, like i mentioned, they exist only to connect other actually important bones.
In the end, the RIG was perfectly functional for my goals, but ultimately unfinished and if I had used my time better I'm confident I could definitely make some great of it.
.jpg)
.jpg)
rendering
The last step of this heavily scaled back project is Rendering.
I knew from the start i wanted to pose the creature in an appropriately Silent Hill-esque environment and the first thing that came to mind was a dark, cramped and dirty hallway.
Time limited how much I could work on the scene, but I feel it came out satisfactorily and fitting for the tone of the project.

Creating the scene was relatively simple.
I found appropriate textures online and edited them on Photoshop to make them dirtier, or to change their colour and overall visual tone. Lighting is also not note-worthy, i simply tried to replicate old yellow-ish lights hanging from the ceiling, to give the scene a very "old and dirty" look.
If there's any sense of "ick" when looking at these images, then i did my job alright enough.


And of course, if the theme of "Being a Weight to your Family" comes through in the design at all (in a very messed up and "thinking outside the box" kind of way), then I'm again satisfied with the result.
CONCLUSION
While I'm disappointed the project didn't reach it's full potential due to previously mentioned circumstances, I'm content with what I was able to produce is the time I actively worked on the project.
I put some rusty skills into practice and when I was making some sweet sweet progress it was very enjoyable.
RESOURCES
Why I love the monsters of Silent Hill - PCGamer: https://www.pcgamer.com/why-i-love-the-monsters-of-silent-hill-2/
Silent Hill WIKI – Monsters: https://silenthill.fandom.com/wiki/Monster
Silent Hill Concepts – Pinterest: https://www.pinterest.co.uk/reisstolga/the-art-of-silent-hill/
What Makes A Great Monster Design: https://www.youtube.com/watch?v=fu9wW-xmkt8
Raw Shock (Silent hill: Shattered Memories Enemy) (Particularly the feminine ver.): https://silenthill.fandom.com/wiki/Raw_Shock
Silent Hill 2 Design Document: http://jolineblais.net/nmd443/wp-content/uploads/silent-hill-design-document.pdf
Body Horror – Wikipedia: https://en.wikipedia.org/wiki/Body_horror#:~:text=Body%20horror%20or%20biological%20horror,unnatural%20movements%20of%20the%20body.
3D Base Human Models – TurboSquid: https://www.turbosquid.com/3d-models/free-obj-model-realistic-white-male-female/1094197#
Psychosexual Definition – IMDB: https://www.imdb.com/list/ls023032982/
Drive and Dedication or something - Me: https://www.youtube.com/watch?v=hWvM6de6mG8