
To Top
E3: Greenscreen Exercise (15/10/2020)
Exercise 1: Introduction to ZBrush (13/10/2021)
For our first proper lesson with ZBrush, we were given the task of creating a basic humanoid bust.
The reference pictures shown here is what we followed.


After about 2 hours of sculpting, while learning the software's basics, this was my result


This bust is the result of a few simple steps, starting from a Sphere:
1 - Deform the Sphere mesh to vaguely resemble the head shape of the reference, using the Move Tool and a large brush size;
2 - While using the Move Tool, decrease the brush size and activate Symmetry to push and pull other aspects of the face into shape, things like the eye sockets, nose, lips, jaw, etc;
3 - By now, the mesh might look stretched and be harder to work with. To fix this, we use DynaMesh, to turn make all mesh faces uniform and eliminate stretched faces, making the addition of more details easier;
4 - Masks are used to select part of the mesh that will or won't be affected by tools. We use this to make the neck, by selecting a small area under the head, inverting our selection so only that small area can be worked on, and pulling that area out to make a basic neck shape. Use DynaMesh to work on the neck further;
5 - Expand the bottom of the neck to create a rough set of shoulders, then add detail. This whole process is helped immensely by the use of Symmetry.
E2: Further Practice with ZBrush (20/10/2021)


That's more or less my process on my first ever proper digital sculpture.
Looking at it now, there's plenty of details i'd change and errors i'd correct, but i think it's a fair result still.
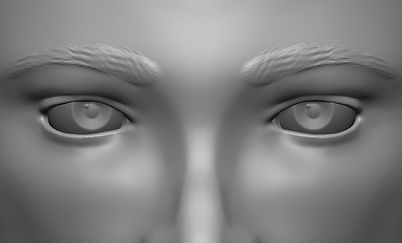
After the general sculpting and minimal detailing of the first lesson, we got into the how of making a bust look more realistic.
Below you can see a clear improvement to what before were shallow and undefined details.


We touched on the topic of sculpting ears, though I wasn't able to get a proper result just yet.


E3: Detailed Nose Sculpting (27/10/2021)

I moved on to make a proper looking nose, following no real reference.
While the general sculpting process is the same, giving it defined, yet smooth lines and faces requires the use of the following tools:
DamStandard helps to dig into the model in a thin line. When used softly, it can bring out those defined edges while maintaining the overall roundness of the model.
HPolish is used to flatten selected areas. It's good for giving different areas of the nose a clearer shape, such as the hourglass shape going front the top to the bottom of the nose.
While there are dozens of tools that can help with detailing, for the nose, these two were invaluable.
On the right is a Turntable render. Having the camera rotate around the model is ideal to clearly show it's details from multiple angles.
E4: Detailed Head Sculpting (13/11/2021)
This was our first Assignment, having to sculpt a full head in detail after only having done so for individual parts of one. A mouth, nose, ears and eyes needed to be added.
Then, separate from the head, we had to create a Nose and Mouth, and present them seperately.
I used the references below, which can be found at 3D.sk.


The first half of the sculpt was done the same way as my first practice sculpts, but with better intent to properly capture the heads shape and dimensions.
The render below will show the full process of my sculpt, from start to finish. ZBrush allows to easily make a timelapse of the project, which i did and then shortened down to 3 minutes.
Before starting the rendering process, i was not aware that, when a Timelapse render is done, ALL previous camera movements get averaged out and used as the camera animation during the render, which explains why at times it rotates and moves far too much.
Still, this render is the clearest way of me showing the development of my head sculpt.


During this sculpt, i furthered my ability to properly create and shape every part of a head.
I had little experience making ears and eyes especially, so this was a great practice for that. I'm proud of how they, and the rest of the head turned out.


In the Turntable bellow, i spliced two different clips into one: an orthographic view render and a perspective view render. This idea was a suggestion from my classmate Leonor.
After finishing the head, i moved on to creating the separate Nose and Mouth, starting with the Nose.
I decided to go for a larger and more curved nose, something different from what I originally practiced with.
My plan wasn't to fully recreate the nose, simply use it as a base to create something different to what i'd done.


My objective was to make a large and defined nose, giving it more depth by sinking it's sides into the face and pushing the tip of the nose away from the face. An easy detail i wanted to add is a pair of laugh lines coming down from the side of the nose. I'm happy with the result.

For the mouth, i wanted to model a woman's mouth, preferably one with puffier and fuller lips, which again, is something different than what i practiced with.


I had a hard time differentiating how the lips connected to the face, in some areas they connect smoothly and in others they have a more defined curve. In the end, i did the edges of the lips my own way and i think its a good result.
E5: Villain Bust Scultping (17/01/2022)
For this exercise, we were given the freedom to choose any fictional villain we wanted and simply recreate them as best we could through sculpting. As there are villains in many shapes, sizes, species, etc, we we're given some freedom when it came to anatomy and realism.
Green Goblin
I had difficulty choosing which to sculpt, but i initially decided to create the Green Goblin, from the original Spider-man movie.

Although this idea was looking like it was gonna turn out great, i had overlooked a detail regarding the project requirements: later on in the project, we'd have to pose their faces and make different expressions.
As this Green Goblin design is a helmet, logistically, it wouldn't make sense for it to express anything other than an evil smile, so i ended up scrapping the idea, though I'm proud of the result anyway.
Zombie

This was the briefest idea i had. After my first attempt, i had even more difficulty finding some specific character to sculpt, so i settled on sculpting a Resident Evil inspired zombie, specifically a zombie inspired by the character William Birkin, at least in his first transformation

As i said before, I didn't get very far with this idea, really only working on it for less than an hour total.

Cesare Borgia
For my third attempt, i wanted to try my hand at sculpting a villain from one of my favourite games, that being Cesare Borgia from Assassin's Creed Brotherhood, who was inspired by the real historical figure with the same name.
This was quite challenging as there are no easy to find images to use as reference for this character, so i used a couple of odd references.
As uncanny as the second and third images might be, they were my best tool when creating this bust. I used the first screenshot and photoshopped it so both sides of the face were somewhat straight and even, then i painted the silhouette of the face so it'd be much easier to see in ZBrush.
I also looked into the proportions of a typical roman man in the time and setting the game takes place in and used that as a profile view reference.


The process of sculpting Cesare was pretty usual, though you might be able to spot the moment where i had stopped and thought i was done, but later returned to work more on the model. As the eyes and hair are separate parts, they only appear later on in the video.
After i was satisfied with the model, i started painting it. I started by adding a skin colour to the entire face, and from that point i added the different skin tones to different parts of the face, plus birthmarks and other details.

This was an interesting project overall, certainly had more changes of plans than any other project of mine so far.