
To Top
E3: Greenscreen Exercise (15/10/2020)
Exercise 1: Cloudy Stonehenge (08/10/2020)

For our first ever exercise, our task was very very simple. To take just 2 images and combine them, whilst making it look as natural a combination as possible. This picture of Stonehenge was the base.
E2: Hybrids (08/10/2020)

For the first half of this exercise, i decided to use this picture of a turtle as the base of my hybrid.
For the second half of the exercise, i chose this snake as the base of the hybrid.

E3: Greenscreen Exercise (15/10/2020)

For this exercise, we were given this image of a woman in front of a green screen and our job was to remove the greenscreen and edit her background.
E4: Apocaliptic Building Exercise (16/10/2020)

In this exercise, our task was to take this picture of a building and turn it into an apocaliptic hellscape, nothing specific, just miserable.
E5: Fake News (06/11/2020)

For the Fake News task, our objective was obvious. We were to create fake news of some kind, beliveable or not. I exclusively used Photoshop to put together a lot of different images and text to create an online news page describing an accident.
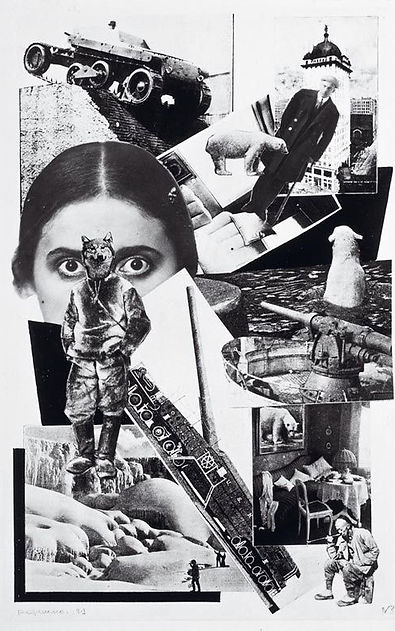
E6: Artist Analysis (02/11/2020)
Alexander Rodchenko
For this task, our objective was to select one out of 3 artists, their names given to us by our teacher, and discuss their style and what we like about it. I decided to talk about the artist Alexander Rodchenko
Alexander has done a lot of work, from photography to painting, but my favorite of his is this composition of images.
He lived through both World Wars and an architectural, artistic and technological revolution. This inspired a lot oh his work, which depicts the world at the time, from the urban jungles he lived in, the war machines that fought in those wars, that wolf headed man represents the artistic revolution that was happening, the abstract thinking that was becoming a new tool in artist's minds, etc.
This compositions represents a lot about him and his life, which is why i like it so much.
E7: Maya Introduction (11/11/2020)
This was our first set of 3D exercises to be completed in Maya. It consisted mostly of practice work and then 2 proper exercises: create a temple using ''building blocks'' and then create a spaceship.
Temple

For the temple exercise i decided to create a greek styled temple, a Tholos, which is an usually small circular temple. This is mostly made out of fancy cilinders and squashed squares with half a sphere at the top.


The lighting was achieved through the use of an HDRI (High Dynamic Range Image) which in most 3D softwares it automatically becomes a light source.
Spaceship

This Spaceship was created from a single Cube, which i then extruded dozens of times until it looked space ship-y enough. From there, I added crevices and creases to the model, to give it more detail and to better control the Smooth tool, which doubled the amount of faces on the model and smoothed all rough edges out to create what you see above and bellow.
By adding creases to the model, the Smooth tool can better detect what should remain a sharp edge and what should be rounded out.


About the Chrome look of the Spaceship, it was suggested we play around with the Materials available to us in the software. I chose the Chrome look, as that's what looked uh cooler.
No clue why the background colour is different, but yeah, there you go.
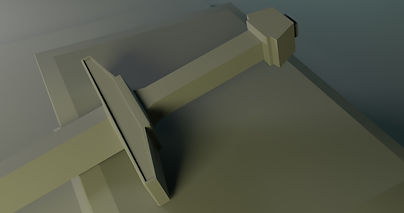
These next 2 models were made to fulfill an optional task, the objective of it being general practice.
The first model I made was a flat-tipped Sword, resting on a pedestal. This is a very low poly model that, while not very complex, i feel was a good exercise to practice Extrude modeling.


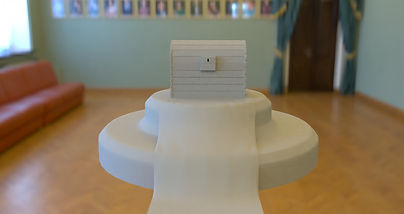
This next model is a Chest, sitting on top of another pedestal with a long rug partially covering it. This was much more complex to model. This is a high poly model, not properly made to be used as something like a game asset, but due to the complexity, i feel, served as good practice.


E8: Mug Exercise (17/11/2020)
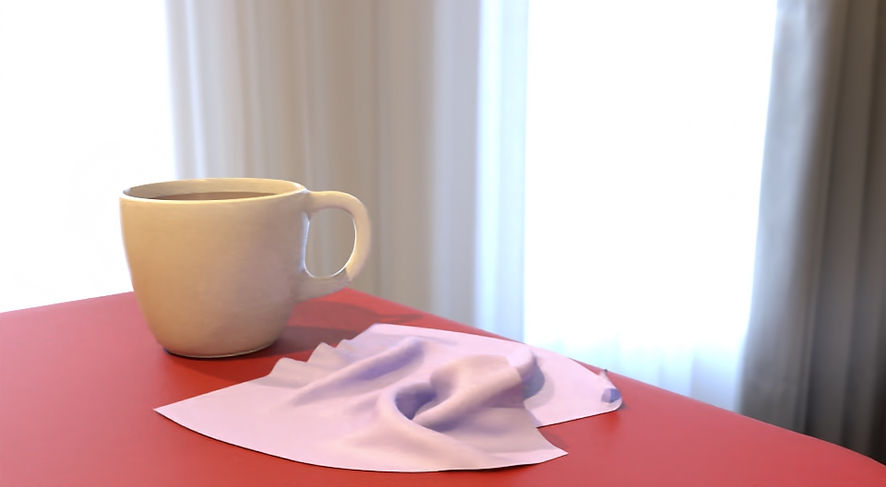
For this exercise, we had to model a Mug, plain and simple. I decided to set it in a proper scene, on a table with a bit of cloth next to it.


The creation of the Mug itself was simple, I took a cylinder, reshaped it and then Extruded 2 faces outwards until they connected to make the handle. I Beveled certain edges that i wanted to keep sharper or more defined, then added a Smooth modifier to round everything out.
I want to highlight the bit of Cloth next to it. This was my first cloth simulation on Maya and i'm proud of how natural it looks.
This was achieved through applying a Collision modifier to the table and a Cloth Simulation modifier to the plane object hovering over it. I then started he simulation, letting the plane fall and deform itself on the table and i stopped the sim when I felt like the shape was ideal. I haven't yet gotten to grips with all aspects of simulations in Maya, so i didn't know how to convert the sim object to a mesh, so i simply copied the object while it was paused mid simulation, which turned it into a mesh.
I've also yet to work with actual textures, so everything in this scene is just premade materials that I slightly edited.
I also used a Denoising setting for my final renders, which gives them a cleaner, yet very slightly blurry look.
E9: Wine Glass Exercise (17/11/2020)

This exercise consisted only of creating a Wine Glass, or any kind of glass really, and rendering it. Like the Mug, i decided to set it in a proper scene, a room lit by a single fireplace.
The glass material is a premade material that comes with the built-in default renderer in Maya, Arnold.
E10: Kettle Exercise (21/12/2020)


For this exercise, I modeled a kettle. The whole process had nothing to note.
E11: Light and Material Exercise (28/12/2020)


For this exercise, I played around with light and material settings, to see what results I could get.
I started experimenting on a Torus shape (Donut), testing materials and lighting. i then extruded some faces to better visualize how Subsurface Scattering affects the object. In the end, i made a Corunot (Corona Donut, haha, very funny).
For my second test, i wanted to apply similar settings to a cloth object. Made it so a plane fell on a Icosahedron, to add a more interesting look to the final look of the simulation. For the material, i played around with Subsurface Scattering, but also Sheen, Coat, Transmission and basic Bump maps. The bump map i used was made from a Noise texture.
E12: Bond Gadget (26/11/2020)

In this exercise, the objective was to create a Bond Gadget. I decided to model a Bulletproof Umbrella, as i think it'd be something fitting for the secret agent.


What makes the Umbrella bulletproof is the metalic looking cloth on the inside of it, which is stitched to the umbrella. The gaps between the bits of cloth stop it from being 100% effective, but it's a limitation of the technology.
To create the cover of the umbrella, i simply squashed a Sphere and deleted the bottom half.
To create the illusion that the little rods holding the umbrella are pushing up against the cloth, I just raised some of the edges on the geometry of the cover.
The clothy look i achieved with the metalic cloth on the inside was done the same way, i simply moved some of the geometry.


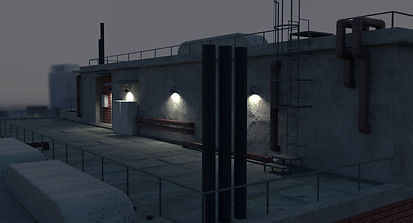
E13: NY Rooftop (14/01/2021)


This project consisted of modelling a rooftop similar to the ones you'd see in New York. I looked online for referance pictures and settled on the image seen bellow.


Just from the first render at the very top, you can see where i stuck to the referance and where i diverted to experiment with and simplify what i had to do. Reduced detail in general and scaled down the size of the building, among many others.
This is also my first project involving proper texturing. Maya has a dedicated tool for texturing called Hypershade, but it wasn't necessary for this project, as i only added textures and moved them around to fit the scale of the model. Not all textures are perfect, but i feel they do the job very nicely.
The building itself might look decently detailed, but its nothing more than 8-ish models copy pasted and each slightly tweaked to visualy differentiate them, with the exception of a few models, like the ladder and metal platform on top of the vents.
The decision to make night time renders was mine, as i wanted to test the lighting and try my best to create a night time scene with this model.


Below are some renders to show the wireframe of these models, to get a better perspective of my work.


E14: Time Leap (23/01/2021)
For this project, my aim was to choose some moment in history, recognizable or not, and model either an environment or object/s.
I chose to model a 50's kitchen, not the steriotypical looking kind, but the average looking kind.


I based the look of this kitchen on two different kitchens: one that i found online, which is a 50's styled kitchen and my grandparent's kitchen, which was built in the 50's


Initially, i aimed to recreate the first referance completely, but decided to deviate midway through creating this environment. I remembered my grandparent's kitchen, so i decided to implement some elements from that into the first referance's design.
The first thing that came to mind was the tiles on my grandparent's kitchen's walls, which i feel are very fitting for the setting I'm attempting to recreate. I got a picture of those tiles and turned them into a texture to use in my kitchen. i changed the patterns to make the texture more colourful overall. Keep in mind, a lot of the kitchen has since been modernized, somewhat.


Apart from the tiles, i used a similar color scheme, to better blend the look of both kitchens.
Creating a more belivable kitchen of this time required me to model a few grandma styled kitchen essentials. As there are many things that fall under that defenition, i mostly just modeled basic kitchen items, with a few extras.

As this project mostly just involved modelling and texturing, with nothing new apart from general modelling skill learned, I have nothing to add to it's description.


Below will be some wireframe renders.


