
To Top
E3: Greenscreen Exercise (15/10/2020)
Exercise 1: Game Designer Inspiration (19/10/20)
Main Inspiration - Masahiro Ito
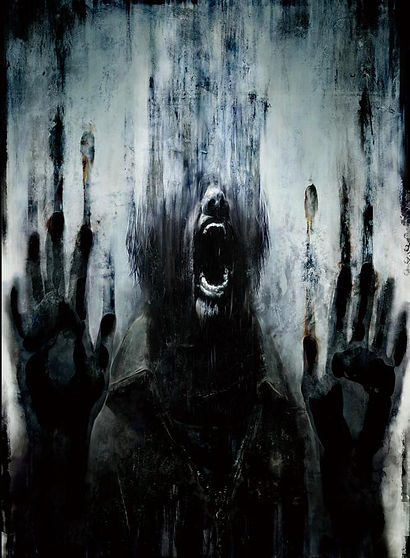
An artist I'm very inspired by is none other than the creator of Silent Hill's infamous monster designs: Masahiro Ito.
Ito started out as a background artist in the series debut in 1999, but became the leading art director during the creation of it's next 2 sequels, which released in 2001 and 2003, respectively. He was absent during the creation of the fourth game, working only as an advisor, receiving a special thanks for his contribution.
For the next few years, Ito worked smaller roles during the development of further Silent Hill instalments, for example, working as the japanese cover art creator the the 2012 8th installment: Silent Hill Downpour.
He still keeps close ties to the franchise, once publicly stating his interest in working more closely with the franchise again, specifically with game developer Hideo Kojima.
One of his collaborations was with the Metal Gear Solid spinoff Metal Gear Survive, working, predictably, as it's creature designer.


Ito is known for his grungy and unrefined artstyle, that gives his creations a creepy and unsettling look, that is both recognizably human and inhuman, always adding a little bit of human elements to his designs to remind players that however monstrous they might seem, they aren't entirely alien. Above is the main concept art for Sillent Hill's most famous monster: Pyramid Head.


What i enjoy about his artstyle, other than the general tone and atmosphere, which as a horror fan i adore, is the flexibility that he works with, which comes with most monster creations from all artists.
When designing human or humanoid characters, artists must keep things realistic, if they want a realistic style, which takes a lot of skill and as an artist of limited skill, i find it very hard to create characters like this without making it stylized in some way.
What makes monster creation so fun is the freedom to add whatever i want to it's design, make it as simple or complex, realistic or unrealistic, everything goes when creating them. That's why i feel so inspired by Ito's creations, since they're a confirmation of my belief.

This freedom in creation is what first inspired me to draw, so why not do it as a career?

Another aspect of Ito's creations that i admire is their symbolism, in this case more specifically his Sillent Hill monsters, which more often than not is not immediatly apparent and makes the discovery of said symbolism a part of understanding his monsters. As Sillent Hill is a psychological horror game where the monsters are created from the minds of the characters inside the titular town, these monsters always represent something about the character is question, their problems, their traumas or even their sins.
Morbid? Yes, but all of these elements combined make Ito's monsters multi-layered and more insteresting, much more than just a ''pretty visual''. Just from his art, the Sillent Hill games he's worked on become more fascinating, as you also must work towards understanding why these monsters are here and what they can tell you about the protagonist.

Bellow are a few drawings i made in March of 2019 for a school project. That project was about coming up with a game concept and i created a horror game with a heavy mix of Sillent Hill and Resident Evil inspirations called Extreme Measures. I also wrote a script, but to post it here would require a lot of translation work, as i wrote it in portuguese.

.jpg)

.jpg)


.jpg)
This was my small instrospective into my favorite horror artist and my main inspiration for my future work.
E2: Forced Perspective Photography (19/10/20)

This task required us to use a figurine/toy or something similar. We then took (or atempted to take) a picture with an effect of forced perspective.
Since i wasn't able to take a great picture purely with that effect, i resorted to Photoshop to get the effect, since it was stated that we could do this.
I also want to thank my classmate Lorena Neagoe for the help taking the pictures.
E3: Child's Dream Project (08/11/20)
Setting - The Farm
My first drawing for this project was an overhead view of the farm the story would take place in. This is in the real world, outside of the dream, where i would set a couple of scenes before the nightmare started.
The nightmare would be set in a massive 'cornfield ocean', where everything as far as the eye can see is corn stalks.


Monster - The Scarecrow
After the original overhead view drawing, i immediately started creating the antagonist for this story. The Scarecrow went through 3 versions: the original sketch, the first real try and the final improvement, which you're seeing on the left.
The first sketch was trashed before i could really appreciate it, so i'll only leave the first try at the end of this slide section.
Protagonist - Isaac
After having fun creating the main monster, i moved on to the main protagonist, the young boy Isaac.
Like the Scarecrow, Isaac went through multiple versions and like the Scarecrow, the first version was trashed, so i can't show it.
This is the final one.

E4: Human Body Perspectives (08/11/20)

For this exercise, i has to draw a human body, realistic or not, in multiple perspectives. I decided to draw Isaac, my character from my Child's Dream Project.
In order, the perspectives drawn are Frontal View, 1/4 Angle, Profile View, 3/4 Angle and Back View
E5: Human Head Perspectives (29/11/20)

Here i had to draw a human head in 3 perspectives. Respectively, a Profile View, 3/4 View and a Full Frontal View.
I thought about drawing a stylized character, but i felt that a more realistic looking head would be better for practice. This is my best attempt.
E6: Skull Drawing lol (28/10/20)

Skull Drawing lol
E7: Hand Drawing Exercise (01/11/20)
For this exercise, the objective was to draw a hand to the best of our ability. I chose to draw my hand and for this, i simply took a picture of it and replicated the pose in this drawing

E8: Point Perspective (03/11/20)
Exercise 3: Child's Dream Project (08/11/20)
E6: Point Perspective (03/11/20)
This exercise consisted of visualizing Point Perspective techniques, used for giving a better illusion of depth and dimensionality to a drawing.

The first drawing on the left is of 1 Point Perspective, which only gives a single dimension to work with. This is enough to be able to better visualize Distance.
The drawing on the right shows 2 Point Perspective. With 2 dimensions to work with, we can now better add Volume to the objects or enviroments we draw.


Finally, on the left, we have 3 Point Perspective. 3 dimensions let's us give a better illusion of Height.
On the right, i'll demonstrate the technique used to measure distance/depth in a point perspective drawing.


Above is my best attempt at drawing my name with point perspective. I used 2 Point Perspective, as i felt 1 was too easy and 3 was too hard for me.
E9: Camera Shots Exercise (28/11/20)
Exercise 3: Child's Dream Project (08/11/20)
E6: Point Perspective (03/11/20)
For this task, we were given a list of camera shots tipically used in photography, film and TV productions, among others. Along with shots, we were also given a list of camera movements. The task was to take an object and try to replicate these shots and camera movements using this object as the focus. Finally, we had to combine 3 different camera movements into one video.
Camera Shots

Extreme long-shot

Long-shot

Medium Shot

Close-up

Extreme Close-up

Dutch Angle
Camera Movements
Zoom
Pan
Pullout
Tilt
Combo
E10: Give Object Life Exercise (12/01/21)


This exercised required me to pick an object, any object, and draw it in a way that "gave it life" in some way. i decided to use of of my fake potted plants and make a little Plant Pot Monster based on it.
E11: Human Proportions (12/01/21)

Here I had to show the proportions of a human body, tipically used when practicing drawing anatomy. As I tipically don't use proper anatomy, this might not be the best representation.